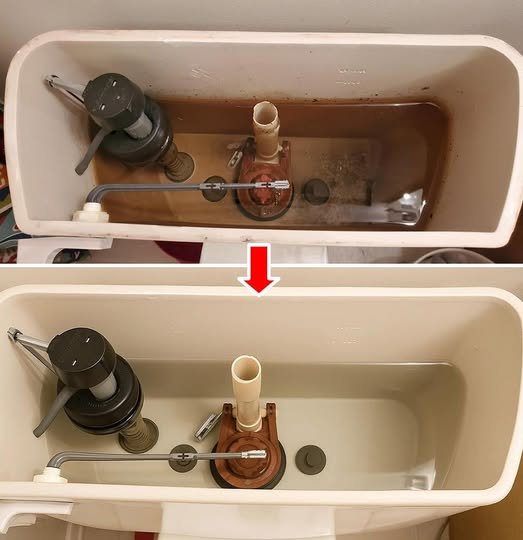
The Trick to Disinfecting and Cleaning Your Toilet Tank to Make It Shine Like New
Cleaning your toilet tank may not be the most glamorous household chore, but it’s essential for maintaining a hygienic bathroom and ensuring your toilet functions properly. Over time, mineral deposits, mold, and bacteria can build up inside the tank, leading to unpleasant odors, reduced flushing efficiency, and even stains that affect the appearance of your toilet bowl. With the right method, you can disinfect, clean, and restore your toilet tank to shine like new.
Why You Should Clean Your Toilet Tank
Many people focus on scrubbing the toilet bowl, but neglect the tank. Here’s why tank cleaning matters:
-
Prevent Bacteria and Mold Growth: Warm, moist conditions inside the tank can harbor bacteria and mold.
-
Avoid Stains and Mineral Buildup: Hard water can leave rust or lime deposits, which reduce the tank’s efficiency.
-
Improve Toilet Performance: Debris or buildup in the tank can interfere with the flushing mechanism.
-
Extend Toilet Lifespan: Regular maintenance prevents corrosion and component damage.
What You’ll Need
-
Rubber gloves
-
Safety glasses (optional, but recommended)
-
Sponge or soft brush
-
Old toothbrush (for hard-to-reach areas)
-
White vinegar
-
Baking soda
-
Bleach or disinfectant (optional, for heavy contamination)
-
Bucket or cup
-
Towels or rags
Step-by-Step Cleaning Guide
Step 1: Turn Off the Water Supply
Locate the water valve behind your toilet and turn it clockwise to shut off the water. Flush the toilet to empty the tank. Use a sponge or towel to soak up any remaining water.
Step 2: Remove Tank Components (Optional)
For a deeper clean, you can carefully remove the flapper, float, and other removable parts. Lay them on a towel so they don’t get lost or damaged.
Step 3: Apply Vinegar or Disinfectant
-
Vinegar Method: Pour 2–3 cups of white vinegar into the tank.
-
Baking Soda Boost: Sprinkle a few tablespoons of baking soda for extra scrubbing power.
-
Optional Bleach: For stubborn stains or mold, add ½ cup bleach. Avoid mixing bleach with other cleaners to prevent harmful fumes.
Let the mixture sit for 15–20 minutes to break down mineral deposits and disinfect surfaces.
Step 4: Scrub the Tank
Use a sponge or soft brush to scrub all surfaces inside the tank, including corners and the bottom. An old toothbrush is great for hard-to-reach areas around bolts or the flapper.
-
Pay attention to mineral buildup and areas that appear slimy or discolored.
Step 5: Rinse Thoroughly
Turn the water supply back on and flush the toilet a few times to rinse away residue. Check that all vinegar, baking soda, or bleach is completely flushed out.
-
If necessary, repeat scrubbing for stubborn stains.
Step 6: Clean Tank Components
While the tank is draining, scrub removable parts like the flapper and float with vinegar or disinfectant, then rinse well before reassembling.
Step 7: Maintain a Sparkling Tank
-
Repeat cleaning every 3–6 months, depending on water hardness and usage.
-
Consider using a tank tablet or natural cleaning solution for ongoing maintenance.
-
Avoid harsh chemicals that can damage tank components or seals.
Tips for a Long-Lasting Shine
-
Wear Gloves: Protect your hands from germs and cleaning chemicals.
-
Avoid Abrasive Brushes: Metal brushes can scratch the tank and damage components.
-
Check for Leaks: While cleaning, inspect flappers, bolts, and hoses for wear.
-
Ventilate the Bathroom: Especially when using bleach or other strong cleaners.
-
Use Natural Cleaners: Vinegar and baking soda are safe, effective, and eco-friendly.
Final Thoughts
Disinfecting and cleaning your toilet tank is a simple but important part of home hygiene. By following this step-by-step method, you can eliminate bacteria, prevent stains, and keep your toilet functioning at its best. Regular maintenance ensures your bathroom remains fresh, sparkling, and sanitary, making this chore well worth the effort.
With the right technique and supplies, your toilet tank can look and feel as good as new—without harsh chemicals or expensive products.