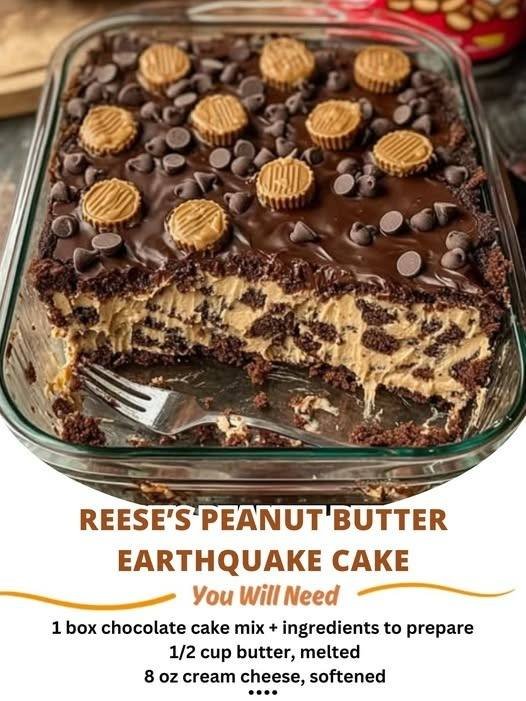
Reese’s Peanut Butter Earthquake Cake
If you love chocolate and peanut butter, this Reese’s Peanut Butter Earthquake Cake is about to become your new favorite dessert. Decadent, gooey, and bursting with Reese’s flavor, this cake gets its name from the irresistible cracks and swirls that form as it bakes—just like a delicious dessert “earthquake.”
Made with a moist chocolate cake base, pockets of melted peanut butter cups, and a rich cream cheese swirl, this dessert is easy to make yet impressive enough for parties, potlucks, or holidays. No frosting required—this cake is pure indulgence straight from the pan.
Why You’ll Love This Cake
-
Ultra gooey texture: Soft cake with molten pockets
-
Chocolate & peanut butter perfection: A classic combo
-
Easy to make: Starts with a cake mix
-
No frosting needed: Built-in richness
-
Perfect for sharing: Great for gatherings and bake sales
Ingredients (Serves 12)
-
1 box chocolate cake mix (plus ingredients listed on the box)
-
1 cup mini Reese’s peanut butter cups (or chopped regular cups)
-
½ cup peanut butter chips (optional, but recommended)
-
8 oz cream cheese, softened
-
½ cup unsalted butter, melted
-
2 cups powdered sugar
-
½ cup creamy peanut butter
-
1 tsp vanilla extract
Instructions
Step 1: Prepare the Cake Base
Preheat oven to 350°F (175°C). Grease a 9×13-inch baking dish.
Prepare the chocolate cake batter according to the package instructions. Pour the batter evenly into the prepared baking dish.
Step 2: Add the Reese’s Layer
Sprinkle the Reese’s peanut butter cups and peanut butter chips evenly over the cake batter. Gently press them slightly into the batter but do not stir.
Step 3: Make the Cream Cheese Peanut Butter Swirl
In a mixing bowl, beat the softened cream cheese until smooth. Add melted butter, powdered sugar, peanut butter, and vanilla extract. Beat until creamy and well combined.
Spoon dollops of the mixture evenly over the cake batter.
Step 4: Create the “Earthquake” Effect
Using a knife or skewer, gently swirl the cream cheese mixture into the cake batter. Do not overmix—distinct swirls create the signature cracked appearance.
Step 5: Bake
Bake for 40–45 minutes, or until the edges are set but the center is still slightly gooey. A toothpick inserted should come out with moist crumbs, not clean.
Step 6: Cool and Serve
Allow the cake to cool for at least 20–30 minutes before slicing. Serve warm or at room temperature.
Tips for the Best Earthquake Cake
-
Don’t overbake: The center should stay gooey.
-
Use mini Reese’s: They melt more evenly throughout the cake.
-
Swirl lightly: Too much mixing removes the signature look.
-
Serve warm: Enhances the melted peanut butter flavor.
-
Line the pan (optional): Parchment makes serving easier.
Variations
-
Extra Chocolate: Add chocolate chips to the batter.
-
Reese’s Pieces Crunch: Sprinkle Reese’s Pieces on top after baking.
-
Brownie Base: Use brownie mix instead of cake mix.
-
Salted Finish: Sprinkle flaky sea salt on top before baking.
-
Gluten-Free: Use a gluten-free chocolate cake mix.
Serving Suggestions
-
Serve with a scoop of vanilla ice cream
-
Drizzle with warm chocolate or peanut butter sauce
-
Top with whipped cream for added indulgence
-
Enjoy with a cold glass of milk or hot coffee
Storage
-
Room Temperature: Store covered for up to 2 days.
-
Refrigerator: Store for up to 5 days; warm slightly before serving.
-
Freezer: Freeze individual slices for up to 2 months.
Why This Recipe Works
The chocolate cake provides structure, while the cream cheese–peanut butter mixture sinks and cracks during baking, creating pockets of gooey richness. Reese’s cups melt into the cake, delivering bursts of chocolate and peanut butter in every bite. The contrast of textures is what makes earthquake cake so irresistible.
Final Thoughts
Reese’s Peanut Butter Earthquake Cake is the ultimate dessert for peanut butter lovers. It’s rich, messy in the best way, and guaranteed to disappear fast. Whether you’re baking for a crowd or treating yourself, this cake delivers bold flavor with minimal effort.