Crispy Gluten-Free Onion Rings: A Perfect Snack or Side Dish
Onion rings are a classic comfort food—crispy, golden, and irresistible. But for anyone following a gluten-free diet, enjoying this favorite snack can be tricky. Fortunately, with a few simple substitutions and careful technique, you can make crispy, flavorful gluten-free onion rings at home that rival any restaurant version. These rings are perfect as an appetizer, snack, or a side to burgers, sandwiches, or even a salad.
Why Gluten-Free Onion Rings Can Be Just as Good
Traditional onion rings rely on wheat flour for the batter, which can make gluten-free versions challenging to get right. The key is to use a combination of gluten-free flour and cornstarch, which creates a batter that’s light, crispy, and golden brown. Additionally, frying at the right temperature ensures that the rings cook evenly, stay crunchy, and aren’t greasy.
Prep & Cooking Time
-
Prep time: 20 minutes
-
Resting time (optional): 10 minutes
-
Cooking time: 15–20 minutes (in batches)
-
Total time: 45–50 minutes
Ingredients (Serves 2–4)
-
2 large onions (yellow or sweet onions work best)
-
120 g (1 cup) gluten-free all-purpose flour
-
60 g (½ cup) cornstarch
-
1 tsp baking powder
-
1 tsp salt
-
½ tsp black pepper
-
½ tsp paprika or smoked paprika (optional for extra flavor)
-
1 large egg
-
120 ml (½ cup) milk or dairy-free alternative
-
Oil for frying (vegetable, sunflower, or canola)
Optional dipping sauces: ketchup, garlic aioli, or gluten-free ranch.
Step-by-Step Instructions
Step 1: Prepare the Onions
-
Peel the onions and slice them into 1 cm (½ inch) thick rings.
-
Carefully separate the rings and set aside. Thick rings work best as they hold their shape during frying.
Step 2: Make the Batter
-
In a medium bowl, combine gluten-free flour, cornstarch, baking powder, salt, pepper, and paprika.
-
In another bowl, whisk the egg and milk together until smooth.
-
Gradually add the dry ingredients to the wet mixture, stirring to form a thick, smooth batter. The batter should coat the onion rings but not be too runny.
Tip: If the batter is too thick, add a teaspoon of milk at a time. Too thin, and it won’t stick properly.
Step 3: Heat the Oil
-
Pour oil into a deep skillet or frying pan, 2–3 inches deep, ensuring enough space for the onion rings to float.
-
Heat the oil to 175°C / 350°F. Use a thermometer to maintain a consistent temperature—too hot burns the batter; too cool makes the rings greasy.
Step 4: Coat the Onion Rings
-
Take one onion ring at a time and dip it into the batter, letting excess drip off.
-
Carefully lower it into the hot oil. Avoid overcrowding the pan—fry in batches to maintain the oil temperature.
Step 5: Fry Until Golden
-
Fry each batch for 2–3 minutes per side or until the rings are golden brown and crispy.
-
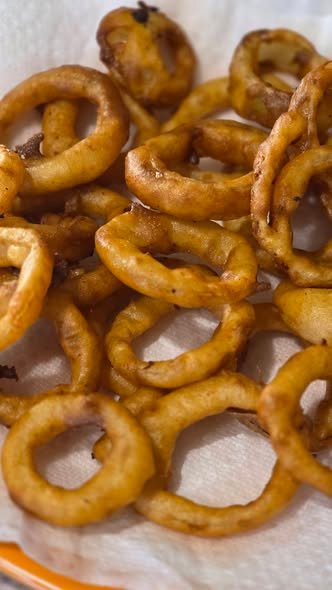
Use a slotted spoon to remove the rings and place them on a plate lined with paper towels to drain excess oil.
Step 6: Serve Immediately
-
Serve hot with your favorite dipping sauces.
-
For an extra touch, sprinkle with a little salt or paprika immediately after frying.
Tips for Perfect Gluten-Free Onion Rings
-
Dry the onions well before battering. Excess moisture can prevent the batter from sticking and make the rings soggy.
-
Maintain oil temperature. Use a thermometer and adjust heat as needed between batches.
-
Double coating for extra crunch: Dust the onion rings lightly with gluten-free flour before dipping in batter.
-
Rest the batter: Letting the batter sit for 10 minutes can improve texture and crispiness.
-
Use fresh oil: Old or reused oil can affect flavor and browning.
Variations to Try
-
Spicy Gluten-Free Onion Rings: Add ½ tsp cayenne pepper or chili powder to the batter.
-
Herb-Infused: Mix 1 tsp dried thyme or oregano into the flour for a savory twist.
-
Parmesan Coating: Mix 2 tbsp grated Parmesan into the batter for cheesy flavor.
-
Baked Version: Preheat oven to 200°C / 400°F, coat rings in batter, and bake on a parchment-lined sheet for 15–20 minutes, flipping halfway. While not as crispy as fried, it’s a lighter alternative.
Serving Suggestions
-
Pair with burgers, sandwiches, or hot dogs for a classic diner-style meal.
-
Serve alongside a fresh salad for a lighter lunch or dinner.
-
Include as part of a party platter with multiple dipping sauces.
Storage
-
Best served immediately while crispy.
-
If leftovers remain, place on a wire rack in a preheated oven at 180°C / 350°F for 5–10 minutes to re-crisp before serving.
-
Avoid storing in a sealed container at room temperature, as the rings will become soggy.
Why These Gluten-Free Onion Rings Are So Good
The combination of gluten-free flour and cornstarch creates a light, airy batter that clings perfectly to the onions. Frying at the right temperature ensures a golden, crispy crust without absorbing excess oil. Adding a pinch of paprika or other spices enhances flavor, making them a delicious, gluten-free alternative to traditional onion rings.
Even those who don’t need to follow a gluten-free diet will find these rings crispy, flavorful, and addictive. They are proof that gluten-free cooking doesn’t mean sacrificing taste or texture.
Final Thoughts
Crispy, golden onion rings are a treat for any occasion, and this gluten-free recipe proves that dietary restrictions don’t have to limit flavor. By following a few simple steps—choosing the right flour, maintaining oil temperature, and frying in batches—you can enjoy restaurant-quality onion rings at home.
Whether you’re cooking for a crowd, serving as a side, or enjoying a snack, these onion rings are sure to be a hit. With optional variations and easy tweaks, you can customize them to suit your taste perfectly.